Stage photography requires planning, skill, and experience. It can be challenging for a beginner photographer. The following tips will help you get excellent images of stage performances such as dances, dramas, and music concerts.
1. Select the right lens for stage photography
Choosing the right lens is one of the most important steps in photographing stage performances. Your lens should have a wider aperture to capture images in low light.
Prime lenses will give you a fast aperture such as f1.2, f1.4, or f1.8. A 50mm 1.8 lens is a good choice when you start learning stage photography. It is cheap, light-weight, and gives excellent image quality.
However, shooting with a prime lens is limiting. You may not be able to get the compositions you want. You may not get a full view of the stage or focus on a single performer.
Using an expensive zoom lens such as 24-70mm f2.8, or 70-200mm f2.8 lens will give you great flexibility. They are the best lenses if you want to do stage photography professionally.
I use a 35mm f1.8 lens and a 70-200 f2.8 lens when photographing stage performances.
Keep in mind it is essential to have a fast-focusing lens to get sharp images in these action-filled low light situations.
Can I do stage photography with a kit lens?
Kit lenses that come with your camera can be used for stage photography. However, they have a narrower variable aperture such as f3.5 to f5.6. When you zoom in an 18-55mm kit lens to 55mm, the widest aperture will be f5.6. So, you need to bump up the ISO to compensate for the amount of light loss.
There are 2 stops of light loss from f2.8 to f5.6. Imagine that you are shooting a stage event at f2.8, 1/200s, and ISO 3200. If you want to shoot with an f5.6 lens, you need to increase the ISO by 2 stops, which is ISO 12800.
Otherwise, you need to lower the shutter speed by 2 stops to 1/50s, which is too slow to capture moving subjects.
2. Your camera matters in this situation
Does gear matters in photography? You may have come across this question many times on the internet. The usual answer is no.
However, gear matters in certain situations. Stage photography is one of these situations. Your camera should have the following characteristics to get good images at a stage performance.
- Your camera should have good in low-light performance. A full-frame camera is the best option.
- It should have good autofocus capability in low light.
- Your camera should be able to record RAW files.
- Your camera should have a higher frame rate per second.
3. Best camera settings for stage photography
There is no fixed camera setting that will give you good results when shooting stage performances. The following settings are general guides that will work in most situations.
- Shooting mode: Aperture priority or manual mode.
- Shutter speed: 1/200s for dance, and 1/160s for dramas with slow-moving subjects. If you are shooting in aperture priority, set the minimum shutter speed to one of these values. A shutter speed of more than 1/200s may record flickering of the stage lights. That will cause banding on the images.
- Aperture: The lowest aperture of your lens such as f1.8 when shooting individual performers. For group performance, you will need to stop down to f2.8 to f4.
- ISO: Set the ISO to auto even if you are shooting in manual mode.
- Metering: spot metering.
- Focus: Single point continuous autofocus (AFC or servo). Disable autofocus assist light on your camera.
- White balance: Auto white balance
4. Find a good spot to photograph from
The best spot to shoot from is the photography pit. However, you may not have access to the dedicated photo pit. Some venues don’t have an allocated spot for photographers.
If you can’t use the photo pit, you need to find a good spot to sit and shoot. Sitting in the front raw may not be ideal. It may not give you a full view of the stage. I found sitting in third or fourth raw is better. You need to sit in the middle, not in a corner.
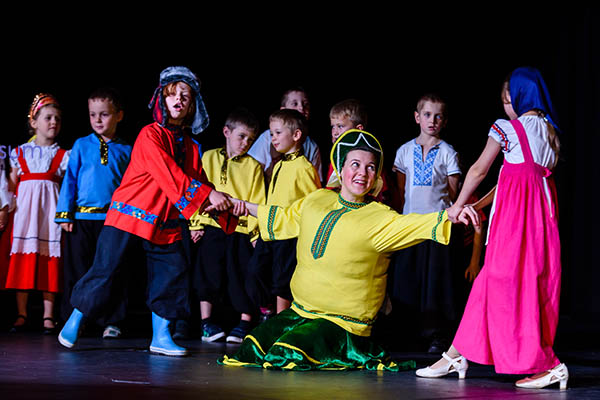
If you shoot from a corner position, you will need a narrower aperture to make all the performers in a group in focus. The image below was shot from a corner. I used f2.8 to take this image. If I was sitting in the middle, I could have used f1.8 and a lower ISO.
5. Never use the flash at stage performances
You should never use a flash when photographing live stage performances because of the following reasons.
- Almost all off the venues don’t allow flash photography when stage performances are in progress.
- The light from flashes can annoy the performers and spectators.
- Stage concerts use various colored lights. Your flash will not give good results.
- Light from your flashgun may not reach the stage to give enough exposure.
6. Visit the dress rehearsal
Visiting dress rehearsals is an excellent way of learning stage photography. Getting permission to visit dress rehearsals can be difficult. However, it is worth trying.
Going to the rehearsals will give you a better idea about theater performances. You can find out the types of performances, how many people are going to perform, lighting conditions, etc.
You can plan the shooting in advance with the information you gather on the rehearsal. It will reduce the pressure on the actual day of the photoshoot.
7. Shoot in RAW format
You will always need some editing of the stage photography images. The mix of colored lights on the stage will produce some unpleasant effects. The white balance will usually be wrong.
Recording the images in the RAW format will give you more latitude when you edit the images. You can change the white balance, adjust the contrast, and reduce the noise.
8. Use a monopod
Using a tripod can be difficult when shooting indoor stage events. Most venues don’t allow using a tripod. A monopod is a good choice in this situation.
The main purpose of the monopod is not to reduce the camera moment. The reason is you are going to use a fast shutter speed such as 1/200s. If you use a 50mm or 85mm lens, the shutter speed is fast enough to handhold the camera. These lenses are lightweight, so they won’t break your back.
If you are going to use a 70-200mm f2.8 lens, probably it will have image stabilization. However, the lens is heavy. You can’t shoot handheld for many hours. You will need a monopod to support the weight of your camera and the lens.
Even if you are going to sit in a middle seat and shoot, you can use a monopod. Just you need to place it between your thighs.
9. You need a lens hood for stage photography
A lens hood is a plastic extension used on the front end of a lens to block unwanted light to prevent glare and lens flare. Photographers usually use lens hoods when shooting outdoors on a sunny day to prevent the sunlight from directly hitting the lens.
Concert theaters usually have many lights shining from different directions. A lens hood will help prevent these lights from directly hitting the lens. That will reduce lens flare and help get clean images.
In addition, lens hoods will protect your lenses from bumps and hits when you move around. They will greatly reduce the chance of damage to the front element of your lenses.
10. Show the colors
The theater performances are colorful. The stages are full of multicolored lights. The performers wear shiny costumes. You should show all these colors in your photographs.
Some photographers tend to make concert photographs black and white. The main reason for that is to mask the noise. These days cameras have excellent low-light capabilities. You can get usable images at ISO 12800 or more.
So, don’t make the images black and white. Show all the colors and the energy of the performance.
11. Take lots of photos
Stage performances are filled with energy, expressions, and emotions. Your job is to capture those moments in a pleasing way. Imagine you are photographing a group dance with 10 performers. You took 10 photos of that 5 minutes dance.
You go home and check your images on a computer screen. You find all the images are technically correct. However, some of the facial expressions are odd, some dancer’s eyes are partially closed, some are fully closed.
You couldn’t find a perfect photo with all the performer’s eyes are opened and facial expressions are good. That is why you should take hundreds of images.
I typically take at least 100 images during a 5 minutes performance. Then I select 5-10 images with good facial expressions.

About the author: Victor is a freelance photographer, technophile, and founder of vxanswers.com.