What is ISO?
In simple terms, ISO in photography is the sensitivity of the camera’s sensor to the light. When you increase the ISO value, the sensitivity of the sensor increases and when you lower the ISO, the sensitivity reduces.
Strictly speaking, when you increase the ISO, the signals from the sensor is amplified by the camera electronics.
In film cameras, the sensitivity is called film speed.
A better understanding of ISO is important to improve your photography skills. A proper ISO setting will allow you to take amazing images.
Base ISO of your camera
Every camera has a base ISO value. That is the value without any signal amplification by the camera. The base ISO value can vary camera to camera. Usually, it ranges from 50 to 200.
For example, my Nikon D 750 full-frame camera has a base ISO value of 100.
You can increase the ISO value whenever you need to. Some cameras also allow you to lower the ISO below the base level. These readings are usually marked as Low 1, low 2, etc.
Native ISO of your camera
Native ISO of a camera is from the base ISO to the maximum value you can set when you normally take photos. It can vary from camera to camera.
Most modern consumer-grade DSLR cameras have a native ISO range of 100 to 25600. Professional DSLR or mirrorless cameras may have a range of 50 to 51200.
Some cameras allow you to increase the setting above the range. These settings may be marked as Hi 1, Hi 2, etc. You may only take black and white images in these higher settings.
In general, the native ISO will give you the highest quality image.
How to Change ISO in your camera?
Many cameras have a dedicated ISO range selector dial. You can rotate the dial to the desired value. If your camera doesn’t have a dedicated dial or button, you need to set the ISO through the camera’s menu system.
If you have difficulty finding it, read the camera manual, which will give you more information.
How Does ISO Affect exposure?
ISO is a part of the exposure triangle. Exposure is determined by aperture, shutter speed, and ISO sensitivity.
For example, you take a properly exposed image with the following camera settings.
Aperture f4, shutter speed 1/60 S, and ISO 200.
If you want to increase the aperture by one stop, you will need the following settings.
Aperture 5.6, shutter speed 1/30 S, and ISO 200.
Or
Aperture 5.6, Shutter speed 1/60, and ISO 400.
When you narrow the aperture or increase the shutter speed, you need to increase the ISO value accordingly.
That means you will need a higher ISO setting if your need narrower aperture and faster shutter speeds.
When to use high ISO?
- Photographing in low light situations such as at indoor events, night photography, and shooting wildlife in woodlands.
- In sports photography where you will need a faster shutter speed such as 1/2000 S.
- When you photograph birds in flight.
- When you need to freeze actions without using a speedlight.
- When you shoot with speedlights, especially bounce flash.
When to use a low ISO setting?
- Always aim for the lowest possible ISO setting as it will give you the best results.
- When you shoot landscapes using a sturdy tripod.
- When you take photos in a studio with the help of strobes. The studio strobes are powerful and give plenty of light to illuminate your subject.
- When you take food or product photography in a studio or at home.
- When you shoot stock images. If your images have lots of noise, the stock photo agencies will reject your images.
Does high ISO give bad images?
You will get the best image quality when shooting at an ISO sensitivity of 100. However, it doesn’t mean increasing ISO will give you bad images.
For example, you are going to take a close-up portrait of your child indoor with available window light. Your camera’s settings are aperture F 2.8, Shutter speed 1/30 S, and ISO 200.
With these settings, you may get a blurry image because of slower shutter speed. I would go for a setting of F 2.8, 1/120 S, and ISO 800. The faster shutter speed will eliminate the effects of camera shake and subject movement and give you a sharper image.
If you have noise in the image, you can reduce it in post-production software such as Lightroom or Photoshop.
Blurriness due to camera shake or subject movement can’t be fixed in post.
What ISO to use with flash?
When you photograph with your camera’s auto mode with flash, the camera will automatically set the ISO to 400 and shutter speed to 1/60 S. These settings are not appropriate in certain situations.
For example, you are taking photos at an indoor event in a ballroom with a very high ceiling. You want to bounce the flash from the ceiling to illuminate your subject.
In this situation, you should use an ISO sensitivity of 1600 – 6400. Otherwise, your flash power is not enough to give the correct exposure. In addition, your flash will draw more power and you will end the session early due to flat batteries in the flash.
Table of ISO settings suitable for various shooting situations.
| Shooting situation | ISO setting |
| Taking portraits in a studio with strobes | 100 |
| Taking outdoor portraits | 100 – 400 |
| Taking posed portraits indoor with window light | 200 – 1600 |
| When using direct flash | 400 – 800 |
| When using bounced flash inside a white, low-ceiling room | 400 – 1600 |
| When using bounce flash inside a room with high-ceiling | 1600 – 6400 |
| When photographing wildlife | 400 – 1600 |
| Landscape photography with a tripod | 100 |
| Wedding photography without flash inside a dimly lit church | 1600 – 6400 |
| Food photography with a tripod | 100 |
| Food photography at a restaurant without a tripod | 800 – 1600 |
How to use auto ISO feature in your camera?
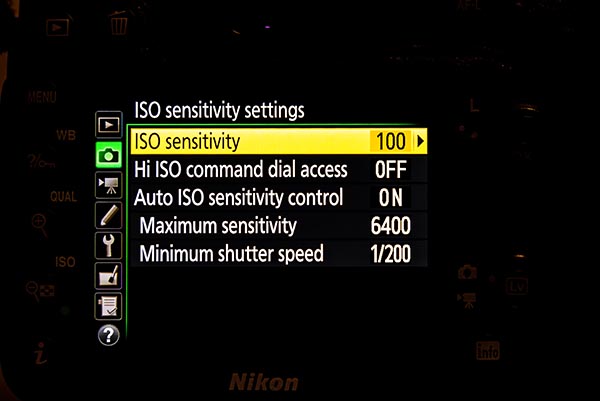
Most of the modern DSLR and mirrorless cameras have an auto ISO feature. You can find this setting in the camera’s menu. It is a great feature that can be used with the camera’s manual or aperture priority modes.
In manual mode, you need to set the aperture and shutter speeds manually. Set the ISO auto and enter a base value of 100 and a maximum value of 6400 or higher. The camera will automatically adjust the ISO sensitivity between the base value and 6400 depending on the lighting conditions.
You can set a base value of more than 100 if you want to.
In aperture priority mode you need to set the aperture manually. Set the auto ISO base value and maximum value. You need to set a minimum shutter speed also. The camera will automatically increase the ISO up to 3200. After that, the shutter speed will drop.
For example, you are selecting the following setting in aperture priority.
Aperture f4, base ISO 100, maximum ISO 3200, and minimum shutter speed 1/120 S.
You get the correct exposure at ISO 1600 and shutter speed of 1/120 S. Assume the lighting condition is the same and you increase the aperture by one stop to 5.6. The ISO will automatically change to 3200. If you narrow the aperture by another stop to f8, the ISO will remain 3200 (because you set the maximum value to 3200) the shutter speed will drop to 1/60 S.
Tip to get good quality images in high ISO settings.
- Use a full-frame camera with a low megapixel count. They have excellent low-light performance.
- Never under-expose your image in the hope of increasing exposure in post-production. If you increase your exposure in post, you will get more noise in the shadow areas.
- Expose to the right (ETTR). This means slightly over-exposing when you take an image. The histogram should be on the right without any clipping.
- Make the final image size exactly what you need for the purpose. Your camera may produce 6000 x 4000 px images. You don’t need that big file if you are only using the image for viewing on a computer screen. Reducing the size of the image to 1800 x 1200 px will give you a clean image.
- Shoot in RAW, this format will give you more latitude when editing. You can use Adobe Lightroom or Capture One software to process the RAW file.
- Don’t over-sharpen the images. Use the masking slider in Lightroom to mask sharpening in unnecessary areas. For example, when editing a portrait, if you move the masking slider to 90, the sharpening will be applied only to the eyes and the hairs. The skin and background will appear smooth and noise-free.
What cameras are good at high ISO?
Camera with larger sensors combine with low megapixel counts perform well in high ISO. Newer cameras with modern sensor technology also perform well.
Cameras with smaller sensors such as point-and-shoot cameras and micro four-thirds have poor high ISO performance.
Here is a list of cameras that have excellent high ISO performance.
- Canon 5D Mark IV
- Nikon D5
- Nikon D750
- Sony a7R III
- Nikon D850
- Nikon Z 6 mirrorless
- Sony A7S II

About the author: Victor is a freelance photographer, technophile, and founder of vxanswers.com.