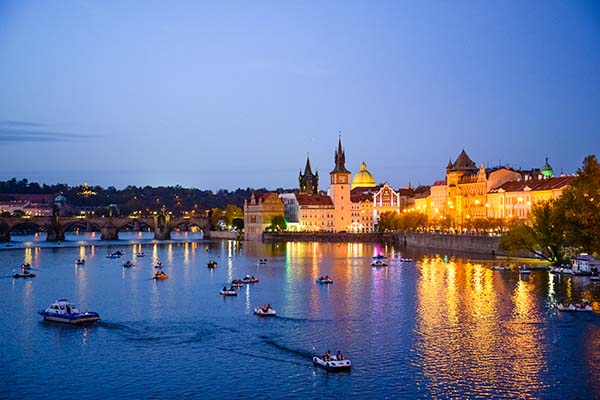
Taking sharp photos in low light is a challenging task for most beginner photographers. Whether you are taking photos at a wedding party, indoor event, or taking a landscape photo at dusk, it is important to understand the basics of low light photography.
Here are nine tips that will help you take sharp photos in low light.
1. Set your camera to aperture priority or manual mode.
Aperture priority mode in your camera allows you to manually set the aperture and ISO sensitivity. The camera will automatically adjust the shutter speed according to the lighting condition.
Manual mode is the best shooting mode when taking photos in low light. In this mode, you need to manually set the aperture, shutter speed, and ISO using the camera’s built-in light meter.
You can also use auto ISO function in your camera while shooting in aperture priority or manual mode.
Don’t know how to do that?
Click here to read my article about the ISO sensitivity setting.
2. Increase the ISO sensitivity.
When you increase the ISO value, your camera sensor will amplify the light signal. Most modern cameras can handle very high ISO.
Cranking up the ISO to 6400 or even 12000 will produce acceptable image quality. You may see some noise in the images. You can reduce the nose in lightroom or photoshop.
High ISO values will give you the ability to shoot with faster shutter speeds. Faster shutter speeds help freeze subject movement and reduce the effects of camera shake. So, you will get a sharper image.
3. Use a larger aperture setting.
A large aperture allows more light into the camera sensor. Using a prime lens with a wider aperture such as f 1.4 or f 1.8 is the best choice. A 50mm f 1.8 prime lens is a versatile, sharp, and affordable lens that will give you amazing results in low light.
If you want a zoom lens that performs well in low light, go for 24-70 mm f 2.8- or 70-200-mm f 2.8 lens. Keep in mind these lenses are heavy and super expensive.
Kit lenses that come with DSLR cameras are not that great in low light situations. They usually have an aperture range of f3.5-5.6. When you zoom in these lenses, the aperture value will be 5.6. That will allow 10 times less light than an aperture of 1.8.
4. Use a slow shutter speed if possible.
You can use a slower shutter speed depending on the situation. For example, you are going to take a portrait in a dimly lit room without a flash.
You can ask the subject to keep still and use a shutter speed of 1/60 S to take the photograph. If you have a better hand-hold technic, you can get away with even slower shutter speeds. The landscape image below was shot handheld at a shutter speed of 1/20 seconds.

Using a lens with image stabilization will help a lot in this situation. I used the Nikon 24-85 mm VR lens to take this image. Some modern mirrorless cameras such as Nikon Z7, Sony A7R IV, and Panasonic S1 have built-in image stabilization.
5. Use a tripod.
When photographing still subjects in low light, you can use a sturdy tripod to stabilize your camera. This will allow you to use slower shutter speeds.
Taking landscape photos at dusk or dawn is a great example. You will need a narrow aperture and lower ISO to get amazing landscape photos.
So, you will need a very slow shutter speed such as one second to achieve that.
Don’t forget to use the self-timer in your camera or use a cable release when taking photos with a tripod at slow shutter speeds. That will prevent camera shake due to pressing of the shutter button.
You should also switch off the image stabilization in the lens when using a tripod.
6. Shoot in RAW format.
RAW is a file format captures all image data recorded by the sensor when you take a photo. It will give you more latitude when you edit your images.
You can process the RAW file in Adobe Lightroom, Adobe Camera RAW or Capture One software.
There are specific ways to process low light images in Lightroom. You can mask sharpening in unwanted areas, and you can move the noise reduction slider to the right.
When you export the file in JPEG format, you should reduce the file size according to your needs. Reducing file size will give you a clean image without any artifacts.
7. Expose to the right.
Exposing to the right (ETTR) is a technic many photographers use to get quality images. It involves slightly overexposing your image without highlight clipping.
You can use the exposure compensation feature in your camera to achieve this.
You should be able to read the histogram in your camera to properly do the ETTR. When you expose to the right, the histogram will be on the right side rather than in the center.
If you underexpose low light images, they will show more nose after post-processing.
8. Don’t affright to use flash.
Brighten up the scene with your flash whenever possible in low light situations. You may be allowed to use flash in an indoor event such as a wedding reception.
In this situation, don’t affright to use your speedlight. It is not that complicated as many people think.
Many flashes have a feature called TTL flash. It is a kind of automatic flash exposure that will make your low light photography super easy.
You can read more about using TTL flash here.
9. Use a full-frame camera.
Your camera’s sensor size matters when you shoot in low light. Cameras with larger sensors perform well in dim light. Lager sensors collect more light compared to smaller sensors.
So, full-frame cameras perform better in low light compared to cropped-sensor, micro four thirds, and point and shoot cameras.

About the author: Victor is a freelance photographer, technophile, and founder of vxanswers.com.
